December 26, 2013

Traditional Fruit and Nut Cake

   The credit for this cake recipe goes to The Duffadars !! This was the first cake I ever baked and is the most frequently made one in our oven . I have been following this blindly since Hetal passed me her family recipe over an email a few years back. The  baking bug has been biting me since last few days and this evening the irresistible urge made me try the recipe yet another time ;  I was not failed this time either :) The room still smells of freshly baked cake and adding onto the holiday vibes.

Fruit and nut Cake

Prep Time : 20mins
Baking Time : 35 mins
Serves : 4-8

Ingredients:
  • 1 cup flour
  • 1 cup sugar
  • 2 eggs
  • 125 g butter ( 1 and 1/4 sticks)
  • 1 tsp vanilla essence
  • 3/4 tsp baking powder
  • 1/4 tsp salt
  • 1/4 tsp nutmeg
  • 1/2 tsp cardamom powder
  • 1 cup nuts etc ( cherries, raisins and cashews; I added crumbled pethas I got from my recent India visit)

Method :
  • Preheat oven to 350 F.
  • Mix butter, sugar and eggs using a hand blender.
  • Add in other dry ingredients slowly to ensure uniform mixing.
  • Bake for 35 mins.
Serve warm with icecream !! Heavenly :)

Keep Baking !

Happy Festive Season ,

Ajanta from Walnut Creek


November 20, 2013

Fishy Chocolate Cake

One of our friends' child, Z is learning to talk and his vocabulary is increasing manifold. One evening, they came over for dinner, and we were having a relatively quiet evening when suddenly little Z pointed at a tea -coaster and said 'Feeesh'! We all burst into a laughter. That was probably the first word he spoke all evening.

It was Z's 3rd birthday and we decided to get him a set of magnetic fishing poles to 'reel in' all the 26 letters of the English alphabet that were engraved on foam shaped like fish. Keeping with the 'fishy' theme, I baked a simple chocolate cake and shaped it into a fish. Little Z's reaction was priceless, and worth every minute of work that went into it. Here it goes -

Time: 2.5 hours (baking, cooling and frosting)
Serves: 6-8 persons

Cake:
I simply followed my tried and tested recipe for a basic chocolate cake here, except that I used regular cocoa powder instead of dark cocoa powder. Since I wanted to shape it into a fish, I baked it in a single layer square 9x9 inches cake pan.

Frosting:
1-1/2 sticks of unsalted butter at room temperature
1-1/3 cups of powdered sugar
Food coloring of choice (optional)
M&Ms (sorted according to color)
  • Whip the butter with sugar into a light fluffy frosting, about 5-8 minutes. 
  • Add food coloring of choice. I did not want a white frosting for a child's cake, so I added a few drops of blue and yellow food coloring gel to get a light pastel green color. Set aside.
Shaping the cake:
  • Once the cake is completely cooled, gently score out the body of a fish. Cut long the score marks using a serrated knife.
  • Place two of the cut out corners along the lower half of the body, to form the fins. Take one of the remaining corners to make the tail. Gently pick up each part and place it on a tray. Trim edges to get desired shape. Attach with toothpicks so the fins and tail stay in place.

  • Before frosting, tuck in strips of parchment paper under the cake sides that can be removed after frosting for a clean finished look.


  • Using a offset spatula, spread the frosting evenly on the cake, starting from the centre and working your way out. Frost the sides and edges completely. 


  • Time to let your imagination run wild. Decorate with M&Ms or any other topping of your choice. I chose M&Ms because Little Z likes to call them gems :)


  • Remove parchment strips for a complete and clean look.


It was a colorful and bright fish, for a happy little 3 year old :)

Bon Appetit! 
Hetal from Houston

November 14, 2013

Diwali Special - Ghughra

It is the festival season that makes us all nostalgic. There are so many wonderful memories of Diwali that I don't know where to start. As we were growing up, we watched Baa and Mom whip up wonderful snacks and sweets for Diwali. The Saat-padi nimki (7 layered salty snack), fafda, mathia and my favorite Ghughra were quintessential and almost synonymous with Diwali in our house. Diwali was the only time Mom would undertake the massive task of preparing them. Ghughra making time for almost like an assembly line - My sister dividing the dough into small balls, I rolled them into flat discs, Baa would fill and close them and Mom would fry them into crispy golden deliciousness.

Ghughra
All through the process, I would be eagerly waiting for that first bite of the Ghughra I'd been waiting to eat since last Diwali! Often, I begged Mom to make it at other times of the year, but she never agreed. I now know that it is an undertaking that she was willing to go though only once in a year! :)

This year, Diwali came a bit early in my house with my parents visiting us here. As a pleasant surprise, Mom agreed to make all the Diwali goodies for me before they returned back to India. Needless to say, we heralded the festive season with delicious Ghughra. Here it goes:

Prep time - 2 hours
Yield - 35-40 pieces

Ingredients:

Filling:
400 grams Khoya/ Mava (room temperature)
1/3 cup chopped cashews
1/4 cup almonds
1/4 cup pistachios
1/3 cup raisins
2/3 cup sugar or more to taste
1 tsp cardamom powder
1/2 tsp nutmeg powder

Dough:
11/2 cups All purpose flour
Pinch of salt
1 tbsp ghee
Water

Ghee for frying

Method:

Filling:
Khoya filling
  • In a medium pan, roast the mava/ khoya until slightly golden brown and aromatic. Stir continuously.
  • Crush all the dried fruits into a course powder in a grinder. Gently mix the dried fruits with the roasted mava, stirring continuously. 
  • Add raisins, cardamom powder, nutmeg powder and sugar.
  • Stir for 5 minutes till sugar is evenly mixed and remove from heat.
  • Let it cool completely.

Dough:

  • Mix all purpose flour, salt and ghee together. 
  • Add small amounts of water as required and knead it into a soft dough. 
  • Divide the dough into small penny sized balls and cover with a damp cloth.
Ghugra making: 
  • Once the filling is completely cooled, start rolling the dough balls into small discs, much like puris. 
  • Take a tablespoon of the filling and heap it on one side of the disc. Gently fold the other half of the disc on top of the filling, to make a half moon shape.
  • Now pinch the dough on the end of the semicircle and twist it to seal the edges. This can be done using a fork, too. Just gently press a fork tongs on the dough edges to seal and ensure that the filling does not pop out while frying.
Dough edges pinched and twisted to seal the filling inside
  • Repeat until all ghugras are ready to fry.
  • Fry in ghee till golden and crispy.
Golden delicious Ghughra

I'm glad Diwali came early to my house :)

Bon Appetit!

Hetal from Houston

November 7, 2013

Pineapple Kheer

This Diwali celebration was a little bit different. It was just the two of us in our new nest in Walnut Creek, CA - far away from the friends we usually celebrate with. Its a new place that promises a new life but memories of good times spent with friends lingered ... I was missing fun we all had cooking together. 

What better way to feel better than to whip up some new recipe for Diwali. I decided to make something simple yet new for the Lakshmi pooja. Rice kheer is simple…and pineapple is our favorite fruit!! There you go… Boom! It took me less than a minute to decide to put them together. 

So I looked up recipes online (a.k.a due diligence) and finally thought the best way would be to stick to the way our Didu (grandma) made kheer and then add pineapple to it. After all, Grandma knows best! Here it goes-

Prep Time: 5 mins
Cook time : 30-40 minutes
Serves : Should be good for party of 4-6.  It was a lot  for just the two of us, so I froze most of it in small plastic containers for much needed portion control!


Ingredients
:
Ingredients for pineapple kheer
Milk - 11/2-2 cups (Any type)
Rice- ¼ cup
Sugar
Fresh Pineapple – ½ cup diced into tiny pieces
2-3 Cardamom pods
Raisins (optional)
Saffron -  few strands
Almonds (Sliced)

Method:
  • Soak rice in water for about 30 minutes. Strain and set aside.
  • Heat milk and let it boil. Add pre-soaked rice to boiling milk.
  • Add sugar and stir till dissolved completely.
  • Add cardamom, saffron and almonds.
  • Add pineapple last and simmer for no more than 2-3 minutes to prevent milk from curdling.
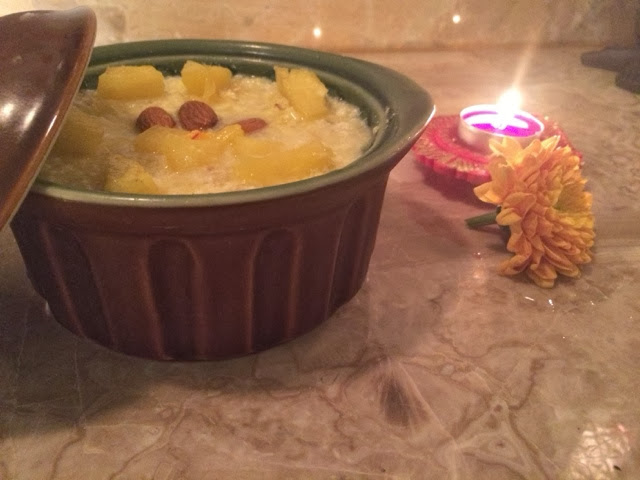
  • Garnish as you desire. I garnished with saffron, almonds and freshly cut pineapples.
  • Serve warm or chilled.

Pineapple Kheer

We thought it was different and tasty …pineapple flavor gave the rice kheer a new twist!!!
Hope you will like it.

Happy Diwali!

Ajanta from Kunming, China this time! :P


October 23, 2013

Turkey lasagna with caramelized onions

      My friend Tanushree had just got done with a major presentation and it was a good reason to celebrate. She is one of my best cooking buddies but sadly we do not get chance to spend time in kitchen together very often.. Made good use of one such rare evenings with all smiles !! Lasagna was the first Italian dish (leaving pizza aside) I have ever tried.  This dish was an experiment since I have forgotten how I made it a year ago. Thanks to our blog that the recipe is getting noted down this time ..for you and me :)
The Turkey lasagna with caramelized onions turned out to be delicious and all of us ate way more than we could / we should.

Serves: 6-8
Prep Time: 30 mins
Cook Time : 30 mins
Ingredients:
  • Lasagna sheets (~ 10 sheets)
  • Ground turkey (1lb); Can be substituted with chicken or more veggies like cauliflower, mushroom to make veg lasagna.
  • Olive oil / butter (2 tbsp)
  • Shredded mozzarella cheese (2-3 cups);
  • Onion (1 medium sized sliced)
  • Garlic (4 cloves chopped well)
  • Red and yellow peppers ( 2-3 medium sized, sliced);
  • Tomatoes (1 -2 chopped)
  • Cilantro (3-4 tbsp chopped )
  • Italian seasoning (2tbsp); 
  • Ground black pepper (2 tsp)
  • Ground thyme (1 tsp)
  • Hot sauce and ketchup (to taste and optional; I like HOT food )
  • Salt (to taste)
  • Cilantro leaves for garnishing
  • Caramelized onion rings for garnishing.
Method :
Turkey filling
  • Preheat oven at 350 degrees F.
  • Bring water to boil in a large container (so that lasagne sheets fit intact) and add sheets. Boil for 10-15 minutes with intermittent stirring. Drain hot water and rinse with cold water to prevent sheets from getting sticky. Set aside.
  • Turkey Filling: 
    • In a small pan, heat 1 tsp olive oil, and add onion rings and allow them to cook in low heat until caramelized. After few minutes add garlic. Fry well for ~ 5 mins.
    • Add chopped peppers now and cook for another 5-10 mins. 
    • Add  tomato and turkey/ chicken and mix well.
    • Add spices (italian seasoning, thyme and black pepper) and stir everything well.
    • Cook covered  in medium flame for ~ 20 mins. Allow the filling to cool slightly before layering.
Layering the lasagna
  • Layering:  
    • Layer a  9 inches by 12 inches pan with 1/ 3rd of lasagna sheets. 
    • Add layer of cooked turkey on it (about half ). 
    • Sprinkle Mozzarella cheese and add hot sauce and ketchup on it. 
    • Repeat layers one more time, ending with lasagna noodles on top.
  • Cover with aluminum foil and bake at 350 F for 30 mins. 
  • Caramelize onion rings separately in 1 tsp olive oil.
  • Garnish with caramelized onion rings, cilantro and Italian seasoning.
Serving Merlot from Whole foods with this dinner was an excellent idea !!
Recipe might seem a little complicated (blame my novice writing style) but it's not...It is surely time consuming so can be saved for special nights, or done ahead of time. :)  Give it a shot.

Buon apetito!!

Ajanta from Amherst


PS : Sorry that I did not take a final pic of it !! 

October 21, 2013

Malabari Paratha or Porota

Every time someone's parents are visiting, the rest of us literally beeline to eat 'homemade' food. Recently, we were invited by our friends for some authentic 'homemade' food from Kerala. I landed a couple of hours early to learn how to make Malabari Porota from my friend's father-in-law (FIL). I brought one 'handvo' as offering for my 'guruji'. I will save the handvo recipe for another post.

It was an interesting afternoon. My friend's FIL speaks only Malayalam, and a few words of English. I do not speak Malayalam at all. All afternoon, we communicated through my friend as the translator, or using sign language. He asked me how I made the handvo, and I showed him by pulling out the ingredients from their pantry, their fridge and sometimes even Google images. He clearly laid out the ingredients necessary for the porota for me, and then asked me to write the recipe. He patiently posed for each picture that I wanted to click while he made the porotas. In the end, he made me try a couple of porotas, and even gave me 'homework'- to practice making them at home and make some in front of him before they leave for India in two months!

I guess love for food transcends language and cultural barriers!

Serves: 6-8 persons
Ingredients:
3 cups all purpose flour
11/2 cup water
Salt to taste.
Oil for rolling and frying

Method:
  • In a large bowl, place three cups of all purpose flour. Dissolve salt to the 11/2 cup of water. Now knead the dough carefully for a long time till the dough is semi-soft, not sticky at all. Cover with a damp cloth and let it rest for 30 minutes.
  • Dough balls
  • Divide the dough into dough balls about the size of a tennis ball. Each dough ball would make two porotas. Baste some oil on them, cover with damp cloth and let them rest for atleast 30 minutes.
  • Grease the countertop with oil. Apply some oil in your palms. Take one dough ball and flatten it with the heel of your palm till it is about a 6-7 inch disc, of even thickness.
  • Place right fingers under the disc facing the top and the left fingers on the top left side of the dough disc, facing the counter. Flip your hands around while holding the dough so that the right hand fingers are now facing the bottom/ counter and the left hand fingers are facing the top. Repeat. Dough will gradually stretch and become thinner. Dont worry if you make any holes. It will all be covered up in the end.
  • Divide the stretched dough with the back of a spoon
  • Once it is thin and almost transparent, divide it into two equal parts with the back of a spoon or a knife. Holding the two ends of one piece, stretch slightly till it folds into a long rope/ ribbon. Roll from one end, into a rosette and tuck the other end under it. Repeat for the remaining dough. Cover the rosettes with damp cloth and let it rest for another 30 minutes. I tried to capture the entire rolling process over here.

Little dough rossettes
  • Grease the heel of your palm with oil. Take one dough rossette and gently pat it into a disc, about 6-7 inches in diameter. 
  • Heat a griddle and cook the porota on both sides till it is golden brown in color.
  • Place the cooked and still hot porota on the countertop and slap to crush it between your hands, so that it becomes fluffy and flakey. Be very careful, as the porota is very very hot. I did it only after the porota was slightly cooler. Its easier to see the crushing in the video here.
  • Serve with a curry of your choice. 
Bon Appetit!
Hetal from Houston

October 8, 2013

Chocolate Cupcake with Mocha Frosting

Cupcakes are always safer to bake as we can control the portion size and it takes lesser time. So last week for a friends get together, I decided to bake very simple chocolate ones. Never doubt the power of chocolate :P  Wanted it to look a little fancy and hence decided to use mocha frosting;  I love mocha :D and this recipe has been tried and tasted by a friend so I gave it a shot.

Packed tight and ready to go  :)
Prep Time: 30 mins
Baking Time: 30 mins
Serves: I never comment on that ;) it made 12 cupcakes though!

Ingredients :


  • 3/4 cup unsweetened cocoa powder
  • 3/4 cup all-purpose flour 
  • 1/2 teaspoon baking powder
  • 1/4 teaspoon salt
  • 3/4 cup (1 1/2 sticks) unsalted butter, room temperature
  • 1 cup sugar
  • 3 large eggs ( room temperature) 
  • 1 teaspoon vanilla extract
  • 1/2 cup sour cream
  • Whipping cream - 1/2 cup
  • Instant coffee powder - 1/4 tsp
  • Milk chocolate - 0.5-1 oz / 5-6 cubes ; this depends on your love for chocolate


  • Method:

    Cake:

    • Preheat oven to 350 degrees and prep 12-cup standard muffin pan with paper liners.
    • Into a medium bowl, sift together cocoa, flour, baking powder, and salt; set aside.
    • In a mixing bowl, cream butter and sugar until light and fluffy. Add eggs, one at a time, beating well after each, then beat in vanilla. 
    • With mixer on low speed, add flour mixture in two batches, alternating with sour cream and beginning and ending with flour.
    • Pour batter into cups, filling each 3/4 full.
    • Bake until a toothpick inserted in centers comes out clean, 20 to 25 minutes.
    • While cupcakes are in oven, prepare the frosting.
    Frosting:
    • Melt the chocolate in a microwave at low power.
    • Add coffee powder and blend well to make sure there are no lumps. Let it cool.
    • Whip the cream with electric mixer till it forms stiff peaks and add the chocolate mixture to it. 
    Tip from friend:  If you don't want to add chocolate, you can mix the coffee with a few teaspoons of whipping cream or milk and then add it to the whipped cream.

    Cool cupcakes in pan for 5 minutes; transfer to a wire rack to cool completely, then spread with frosting using a table knife or small offset spatula.
    Decorate with grated chocolate, walnut / almonds or anything of your choice.

    Enjoy baking! Bon Appetit ...

    Ajanta from Walnut Creek, CA this time :)

    May 25, 2013

    Warm Mixed Berry Almond Cake


      My friends had baked this cake for me on my birthday and I knew it right away that I had to bake this to make someone else happy :) Who better than my adorable nephew I am visiting this rainy wintery like weekend at the end of May !!! And for us adults, what better than  a slice of warm cake and coffee on this awfully gloomy rainy day !

    This is inspired by Martha Stewart's cherry almond cake but my friends had used mixed berries so I decided to stick to that.

    Prep Time : 1 hr 15 mins
    Serves : It's a cake ... how can we decide ?!? 1 or more ;)

    Ingredients :


    • 1 stick of butter ( warmed to room temperature) Recipe calls for more butter for pie plate but I use baking spray because it is easier.
    • 1 cup all-purpose flour
    • 1/2 tsp baking powder
    • 1/2 tsp salt
    • 3/4 cup sugar
    • 3 large eggs
    • 1/2 tsp pure almond extract
    • 12 ounces ( 1 bag) of frozen mixed berries ; thawed and dried .. but I had no time to dry it !
    • 1/2 cup sliced almonds ( I used chopped and whole.. really should not matter )
    Method:
    •  Preheat oven to 350 degrees. Grease and flour a 9 inch pie plate and set aside.
    •  In a medium bowl whisk together flour, baking powder and salt.
    •  Using an electric mixer whisk together butter and sugar till light and fluffy. Add eggs one at a time beating well after each addition. Beat in almond extract and then add the flour mixture on a low speed . Do not overblend.
    • Transfer batter to prepared pie plate ; scatter berries and almonds on top. Bake for 50-55 mins or untill toothpick inserted in center of cake comes out clean. 
    A piece of berry cake with whipped cream..Yumm yumm


    Serve warm with whipped cream / chocolate sauce or chocolate ganache !

    Happy Baking & Stay warm !

    Ajanta from Amherst ( Actually Medford this evening )

    April 11, 2013

    Paleo Lemon Pound Cake


         Before I start writing this blog, I would like to declare in public that I am NOT following  paleo diet ! I am too much of a foodie so far,  to do this :) But as saying goes 'never say never !' This was an experiment with a friend who is trying paleo and I was tempted to try something different after baking fatty sinful cakes for all these while.. Can't really deny the guilt trips most of us take after eating those yummy cakes...can we !?! Lemon is an all-time favorite and this one looked easily doable ! Turned out to be very tasty and exactly of the texture one would like pound cake to be ....here is the link for recipe we found but below is how we did it :) 
      
           We could not find all the ingredients we needed in the only grocery store we visited... Should not be hard to find if you at least try two stores may be ! We were lazy, but you are not  :P !!  So let's honestly call this a partial paleo cake :)

    Prep Time : 20 minutes
    Baking Time : 40-45 minutes
    Serves : 5-10

          
    Ingredients : 

    Dry :

    Almond flour - 2 cups                        
    All-Purpose flour - 1/2 cup
    Sea salt - 1/2 tsp
    Baking soda - 1 heaping spoon

    Wet :

    Raw honey - 2/3 cup , warmed to a liquid state
    Olive oil - 2/3 cup
    Large eggs - 4
    Full-fat coconut milk - 1/2 cup
    Vanilla Extract - 2 tbsp
    Lemon zest - 1 tbsp ( I mixed orange zest as well )

    Glaze :

    Freshly squeezed lemon juice : from 2 lemons ( Please strain it ) 
    Lemon zest - from 1 lemon
    Vanilla extract - 2 tsp
    Raw honey - 4 tbsp


    Preparation :
    1. Preheat oven to 350ºF.
    2. Prepare a 9x9 baking pan by coating the interior lightly with olive oil. 
    3. Sift dry ingredients in a large mixing bowl and stir with a whisk to combine.
    4. Place oil and honey and mix  for 1-2 minutes using electric blender. Add eggs, one at a time, mixing after each addition. Add coconut milk, vanilla, and lemon zest, and continue to process until well combined.
    5. Make a well in the center of the dry ingredients and pour in the wet ingredients. Use a wooden mixing spoon to thoroughly combine ingredients, pressing out any lumps. Use blender if needed and we did need :).
    6. Pour batter into prepared pan and bake for 40 minutes or until a toothpick inserted in the center comes out clean. The top was supposed to be lightly browned and mine came out dark brown.
    7. Let cake cool in the pan for 10 minutes, run a butter knife around the edge of the pan to loosen the cake, and then turn it out onto a cake plate and let cool completely.
    8. While cake bakes, prepare the glaze by adding vanilla extract, lemon juice, zest, and honey to the pan. Bring to a simmer over medium heat. Reduce heat to low and simmer for 10 minutes. Let cool to room temperature.
    9. Using the tines of a fork, perforate the top of the cake several times. Pour glaze over the cake, using a spatula to evenly distribute the glaze over the entire cake top. Let the cake rest for an hour to fully absorb the glaze. Serve immediately or cover and store in the refrigerator.

     It was a good combo with our evening Chai that day ! Totally non-paleo :P 

    Have fun baking :)

    Ajanta from Amherst

    April 3, 2013

    Easter bunny bread

    This Easter, I wanted to tackle the dreaded bread monster. Armed with my lovely new (and red!) stand mixer, I decided to make some hot cross buns. The store-bought hot cross buns are a tad bit sweet for my liking.

    So, on Good Friday, I baked the first batch of hot cross buns. I followed the Joy of Baking Hot Cross Buns recipe to the t, and they turned out to be wonderful. Thanks to my good friend Amrita of Sweet n Savory for being the inspiration. :)

    Encouraged, I took on the basic white bread recipe from the book that came with my lovely new (and red!) stand mixer. Yes, I love my stand mixer that much!!! I wanted to make it look somewhat like this Easter Bunny Bread, but using fresh dough instead of the frozen. Here it goes -

    Ingredients:

    Basic White Bread:
    1/2 cup low fat milk (I used 1%)
    3 tbsp sugar
    2 tsp salt
    2 tbsp butter
    2 packages active dry yeast
    1 1/2 cup warm water
    5-6 cups al purpose flour

    Bunny shape:
    2 raisins
    2 sliced almonds
    1 egg, lightly beaten

    Method:

    1. In a small sauce pan, place heat milk, salt, sugar and butter in low heat until the butter melts. Let it cool to lukewarm. Meanwhile, dissolve the yeast in warm water. Let it 'activate' till foamy (about 10 minutes).
    2. In the mixer bowl, add the milk mixture and about 4-41/2 cups flour. Using the dough hook, mix it while adding the yeast mixture. Add the remaining flour and mix till the dough starts to come together in a ball. Knead till the dough is smooth. 
    3. Divide the dough into two equal parts and shape into loaves.
    Now for the fun part - I almost relived my childhood days, playing with 'Play Doh' or ' Plasticine' as we called it then. 
    • Prepare a baking sheet - grease and line with parchment paper.
    • Cut a fourth off of one loaf and gently shape into a drop or pear shape to form the bunny's head. Flatten remaining portion into an oval shape and place on the sheet. Place head above body. I used a pair of kitchen shears to make cuts on each side of head for bunny's whiskers.
    • Divide the remaining loaf into four equal portions. I did that using a greased knife. For ears, shape two portions into 14-16 inches long ropes. Now, fold ropes in half and arrange them as the bunny's ears with open ends touching head. Gently tuck the open ends under the bunny's head, for a more clean look. I had to adjust the shape of the ears to fit my sheet tray.
    • Cut the third portion of dough into two and flatten them into ovals for paws. Cut two slits on the edge of each oval for bunny's tiny toes. Position on each side of the bunny's body. Now it should start to resemble a bunny.
    • Divide the fourth portion of dough into three balls.  Use two for front paws. Place paws on each side of body. You could make slits for its toes here as well. Cut the third ball into three, and shape them into two smaller (about 1 inch) balls for the cheeks and one 1/2-in. ball for nose. Place cheeks and nose on face. Add raisins for eyes and almonds for teeth.
    Bunny bread as it sat on the counter to rise.
    • Cover and let rise in a warm place, about 30-45 minutes. I sprayed the cling film with oil so that it does not stick into the bunny as it rises. 
    • Once it is doubled, brush dough with egg. Bake at 350° for 20 minutes or until golden brown. Remove to a wire rack to cool.
    Fresh out of the oven
    • Place bread on a serving tray. Cut a 3-1/2-in. circle in center of body. Hollow out bread, leaving a 1/2-in. shell (discard removed bread or save for another use). Place a 1-cup shallow bowl in the hole and fill with dip. I used some lettuce leaves to cover the bowl before placing the dip. Serve with vegetables, cheese and crackers of your choice.


    It was a huge crowd pleaser, and no one wanted to take the first bite off the cute Easter Bunny!! It made for a wonderful Easter spread centerpiece :)

    Bon Appetit!
    Hetal from Houston