April 23, 2012

Matar Papdi/ Curried Sugar-snap Peas

Many many years ago, Mom had a really tough time getting my sister to eat green vegetables. Anything green on her plate would be deemed to be 'kaarela' (bitter melon), and remain untouched! The only green vegetable that didnt qualify as 'kaarela' was green peas. Needless to say, Mom incorporated peas in most dishes, hoping that some of it would end up in her stomach. Matar Papdi is a traditional Gujarati dish usually made during winter with very tender whole peas in a pod. This dish was one of her (and my) favourites, and still is. I find sugar snap peas to be the closest to those 'tender green peas in a pod' back home. Here it goes.
Serves: 2-4 persons
Preparation time: 5 minutes
Cook time: 20-25 minutes


Ingredients:
1 pound Sugar snap peas.
Ajwain/ carom seeds
1 tbsp oil (any)
1/4 tsp hing/ asafoetida
1/4 tsp baking soda
1 tsp ajwain/ carom seeds
1 tsp haldi/ turmeric powder
1-2 green chillies (whole)
1/2 tsp red chilli powder
2 tsp dhania-jeera/ coriander-cumin powder
Salt to taste
Coriander/ cilantro leaves for garnish
Water


Method:
  • Thoroughly rinse and pat dry sugas snap peas. 
  • Set a large non-stick fry pan to medium heat and add oil. Once the oil is hot, add ajwain/ carom seeds. Once the seeds turn golden brown & fragrant, add the hing, baking soda and green chillies.
  • Spiced up
  • Add sugar snap peas and toss gently. Add salt and turmeric to the sugar snap peas. Add 1/2 cup water. Reduce heat to medium low and cook, stirring occasionally.

Almost tender sugar snap peas
  • Gradually, the peas will become tender. Next, dhania-jeera powder and red chilli powder. Continue to cook till peas cooked thoroughly. Note: Over-cooking the pods will make them come apart.
    Matar Papdi
  • Garnish with coriander leaves (optional). Serve hot with rice & Gujarati kadhi or toor daal.
Served with rice and toor daal


P.S: Some mature snap pea pods may need to be "stringed" i.e. membranous string on the sides removed.


Bon Apetit!
Hetal from Houston

April 18, 2012

Starry Egg Toast

I can never decide what I want to eat for breakfast. Maybe because its too early in the morning, and I'm still "booting" (read half asleep) most days! So to come up with a nice fancy breakfast for family/ friends is a BIG deal for me. I'd rather do something super simple and pass it for something fancy. Here is my take on the simple egg in a toast, made to look fancy-shmancy :)

Cook time: 5-7 minutes
Serves: 1-2 persons
Ingredients:
2 slices of bread (Any bread you like)
2 eggs
Butter/ oil spray
Salt to taste
Pepper 1 pinch
Cheese (optional)
1 star shaped cookie cutter

Method:
  • Set a non-stick griddle/ pan on medium heat. Brush/ spray a little bit of butter/ oil.
  • Using the cookie cutter, cut out a star in the center of one bread slice, wiggle gently to get a star shaped hole in the slice. Repeat for the remaining slice. Save the star shaped bread.
  • Lightly toast the bread and the star shaped piece on the griddle/ pan. Flip both onto the other side. 
  • Gently break an egg into the star shaped hole. Reduce heat to low. Cover with a lid.
  • Uncover and remove from heat when egg is done to the consistency you desire. Gingerly slide the Starry Egg toast into a plate. 
  • Sprinkle salt, pepper, cheese etc. Serve hot.
Starry Egg Toast
Bon Apetit!
Hetal from Houston

April 16, 2012

Mango Pie

Mango is undoubtedly my favorite fruit and anything about it (even thought) makes me very happy. I got this recipe from a friend a few summers back and since then it has always been in demand. Here goes the unbelievably easy recipe for all of you.
This recipe calls for 3 mango pies. The friend who passed me this recipe tried adjusting ingredient amounts to make 1 pie and unfortunately it did not turn out well- she warned! But you never know, it might work for you! I have not tried yet coz most of our friends have sweet tooth. So we never have leftover desserts in our fridge :)

Mango pie with fresh strawberries

Serves: 1 - 16 ( Totally your wish !)
Prep Time: 15 mins
Setting time: Minimum 4 hours
Ingredients:
  • Mango pulp can (850 gms); Indian Grocery Stores carry cans with exactly this amount.
  • Sour cream (8 oz)
  • Philadelphia Cream Cheese (8 oz)
  • Plain gelatin (3 sachets); Generally plain gelatin packet comes in 4 sachets of net weight 4 oz
  • Sugar (6 tsp)
  • Pie crust (3 small)
Method:
  • Mix sour cream and cream cheese and beat it lightly (~ 3mins) to soften it.
  • Mix mango pulp with sour cream and cheese.
  • Dissolve gelatin in water as per instructions on the packet.
  • Add sugar and gelatin to the pulp and mix well.
  • Divide the mixture into three parts; I just pour it into crusts and fill them to the brim.
  • Cool it in the refrigerator for four hours or till the pulp is set.
Serve chilled with Cool Whip or fresh fruits.
A slice down ;)
A very happy spring to all of you !! 

Cheers...
Ajanta from Amherst


April 9, 2012

Carrot shaped carrot cake

While I have baked many a cake, I usually frost or glaze them - never mustered enough courage use fondant. I love carrots and carrot cakes. Sadly, my best taste tester (read hubby) does not. Needless to say, I rarely bake carrot cakes. 
So when we invited our friends over this Easter, I decided to bake a carrot cake and cover it with marshmallow fondant. I used my favorite carrot cake recipe here and made a carrot shaped carrot cake. Here it goes.


Preparation time
For cake: 10 minutes
For cream cheese frosting: 15 minutes
For fondant rolling/ decorating: 30 minutes + 8 hours rest.
Bake time: 30 minutes + cooling time.


Carrot Cake
Cake Ingredients:
2 1/2 cups all-purpose flour, plus more for pans
  • 1 tsp baking powder
  • 1 tsp baking soda
  • 1 tsp ground cinnamon
  • 3/4 tsp coarse salt
  • 1/2 tsp ground ginger
  • 1/4 tsp ground nutmeg
  • 3 sticks unsalted butter, room temperature, plus more for pans
  • 1 cup packed light-brown sugar
  • 1/2 cup granulated sugar
  • 3 large eggs
  • 2 teaspoons pure vanilla extract
  • 1/2 cup water
  • 1 pound carrots (8 to 10 medium carrots), peeled and shredded
  • 1 cups walnuts, finely chopped.
Cake Method:
  • Grease and line a 11x9" sheet pan and a 8"x8" square pan (or any other shape) with parchment paper. I used only the sheet pan cake to make the carrot shape. I did not want to reduce the recipe to half, lest it changes the chemistry. You can use the other cake to make a smaller carrot, or any other shape. I just frosted it with cream cheese.
  • Whisk together flour, baking powder, baking soda, cinnamon, salt, ginger, and nutmeg.
  • Whip butter and sugar (Both white and brown) with a mixer on medium speed until fluffy. Add one egg at a time, beating well after each addition. Add vanilla extract, water & grated carrots. Beat until well combined. 
  • Reduce speed to low, and add flour mixture, then finely chopped walnuts.The batter will be very thick.
  • Pour batter into prepared pans, dividing evenly. Bake for 30 minutes, or until a toothpick inserted into center comes out clean. Let cool completely.
Cream cheese frosting
Frosting Ingredients
  • 2 tbsp unsalted butter, softened
  • 8 ounces cream cheese, room temperature
  • 1 cup powdered sugar
  • 1 teaspoon vanilla extract
  • Frosting Method
  • In a large bowl, beat together the butter and cream cheese with an electric mixer. 
  • With the mixer on low speed, add the powdered sugar gradually until smooth and creamy. Add the vanilla extract and beat again.
Carrot Shape:
  • Cut the sheet cake along the long side into half. 
  • Frost one of the halves, with cream cheese frosting. 
  • Gently flip the other half over.
  • Cut and shape into a carrot, with narrow side being about 3/4" wide.
  • Frost entire cake with cream cheese frosting.
  • Refrigerate for 40 minutes.
Carrot top:
  • Cut a small piece of cake, about 2"x1". Frost with cream cheese. 
  • Layer with another piece, and frost completely. Refrigerate for 40 minutes.
Marshmallow fondant:
  • Prepare white marshmallow fondant as per this recipe a day ahead. Refrigerate for 8 hours wrapped in cling film. 
  • Orange fondant: 
    • Placing rolled fondant on carved cake
    • Pinch tennis ball sized fondant, and microwave for 15 seconds to bring it to soft maleable form.
    • Add yellow and red gel food color drops to get orange color. Start with couple drops and add as needed.
    • Knead till color is evenly blended.
    • Grease counter top thoroughly. With a rolling pin, the orange fondant into 1/2" thick disk. Greasing rolling pin might help the rolling process. Also, sprinkle corn starch/ powdered sugar to keep the fondant from sticking.
    • Trimmed excess fondant
    • Gently lift the rolled fondant and place on the cake.
    Lines and indentations to make it look 'real'.
    • Trim the excess from sides.
    • Use a cheese knife to make random lines on the fondant to resemble a real carrot.
  • Green fondant:
    • Follow same process to color a small piece of fondant into green, for the carrot top.
    • Roll and cover the carrot top. 
    • Trim and decorate. 
    • Attach to the carrot, using cream cheese frosting as glue.
With green fondant carrot topping
  • Everyone at the party seemed pleased, and my best taste tester loved the cake so much, that he finished whatever was left of the cake as a midnight snack!!

Bon Apetit!
Hetal from Houston


PS. You can use any carrot cake recipe, or even a box mix. 

Easter Bunny cookies

Spring is here. My dahlia plants are growing quickly, and a pair of doves are nesting in one of the hanging planters in my patio. 
It also means its time for Easter. While it is a relatively new festival for me, I think its a wonderful way to celebrate the advent of spring.  All the colourful eggs and bunnies make me smile. This Easter, I made some white bunny butter cookies with pink ears to give away as party favors. Here it goes. 


Preparation time: 1-1.5 hours
Bake time: 20 minutes
Yield: 40-45 cookies


Ingredients
3 cups all purpose flour 
1/4 teaspoon salt
1 cup/ 2 sticks unsalted butter (room temperature)
1 egg (room temperature)1 cup sugar

1 teaspoon pure vanilla extract
Pink gel food color

Method:
Cookie dough:
  • In a medium bowl, whisk flour and salt together. 
  • In a large bowl, beat two sticks of butter and sugar together until fluffy. Beat in egg and vanilla until mixture is pale and smooth.
  • Add the flour mixture in and mix just until the flour is incorporated. The dough might not come together completely. Knead into a soft ball. 
  • Take a ball of dough about 2-3 inches. (I made some pink bunnies too. Pinch off less if you want only white bunnies). Add a drop of pink food colour to the small piece of dough and knead well, till the colour is evenly blended. Add more colour if you want a darker shade of pink.
  • The dough is pretty firm- almost like play dough consistency. I started shaping right away. If the dough is soft to work with, cover in cling film and refrigerate for 45 minutes and then work on the shapes.
Shaping:


  • Line baking sheets with parchment paper. Roll a tablespoon of dough into a smooth tear drop shape to resemble a bunny. Gently place on the baking sheet. Repeat with the remaining white dough. Place each of the shaped cookie dough about 1'' apart. The cookies dont spread much. 
Pink bunny ears.
Super cute bunny tails
Tiny pink bunnies
  • Pinch very small amount of pink dough, and shape into a bunny ear. Place on top of the white dough bunny and press down gently. Repeat for the other ear. I tried several shapes (some with round base and narrow tips, some floppy ears and some narrow long ears), and dont think any two bunnies looked identical. 
  • Pinch an even tinier amount and make a tiny bushy tail of the bunny. Repeat above process for tiny pink bunnies.
  • Refrigerate the cookies for 30-45 minutes. 


Baking:
  • Preheat oven to 350 degrees F.
  • Bake for 18-20 minutes in the middle or lower rack till cookies light brown on the bottom.
  • Let cool completely. Make tiny eyes (with molten chocolate and a toothpick), whiskers etc if you wish. I just left them the way they were. Simple and cute!
Easter bunny cookies 
Wrapping: Since I wanted to give each guest some cookies as party favors, I had to figure out a way to wrap them in small boxes. Here's what I did.
  • Printed template I had seen here, and improvised to make it somewhat simpler (given that I was making these the night before Easter). I swapped the bunnies for eggs, and cut the template on colourful construction paper. 
  • Wrapped 4-5 cookies in cling film and placed in each of the folded boxes. Tied the top with wire tiebacks.
  • Adorned boxes with easter ornaments and candies. The outcome was cute and colourful. What do you think?
Easter party favours
Happy Easter!!
Bon Apetit!
Hetal from Houston


PS. I made two batches of cookies, and they turned out great both times. :)
PPS. This recipe is based on original recipe from Rabbit Cookies.

April 6, 2012

Posto Boda - Spicy Poppy seed cutlet

Posto boda or spicy poppy seed cutlet is probably my favourite Bengali side dish. It is a staple in most Bengali households, including my in-laws'. It is usually served with rice and daal. I learnt how to make this from my mom-in-law who is a fantastic cook! Here it goes.
Serves - 2-4 persons
Preparation time: 10 minutes
Cook time:10 minutes
Ingredients:
1 cup Poppy seeds
1 red onion (small size, finely chopped)
2-3 green chillies
Salt to taste
Oil for shallow frying (I used mix of light olive oil and mustard oil)
Posto paste with onions and green chillies
Method:
  • Soak poppy seeds in water for atleast 30 minutes. Grind soaked and strained poppy seeds and salt in a mixer/grinder until a coarse paste is formed.
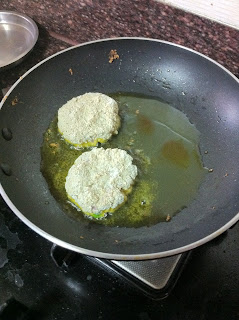
  • Add chopped onions, green chillies and mix well. Gently form 1-11/2" diameter flat cutlets.


  • Heat oil in a non-stick frying pan.
  • Shallow fry the cutlets on medium heat till crispy golden brown on each side. Place on a paper towel to absorb excess oil.
  • Serve with steamed rice and daal.


Crispy golden Posto Boda
Bon Apetit!
Hetal from Houston

April 4, 2012

Modernized 'Pithe' : A Sankranti special for Bengalis

Sankranti is a winter festival celebrated all over India and very close to my heart because of all the joyous childhood memories it brings back...This day's menu in a typical Bengali household solely consisted of plethora of sweets in different shapes, sizes and consistency... Sheer Bliss for people with sweet tooth!!


This year, I tried making this Bengali sweet but in an extremely non-traditional way. The taste was very much the same with minimal effort. I learnt it from a family friend who had been away from India for many years and knows many such taste-tricks to keep us going!
Serves : 8-10 people
Preparation Time : 5 mins
Cooking Time : 30 minutes
Ingredients:
Lightly toasted crumpets
  • A packet of British style crumpets from Trader Joe's (12 count)
  • 1&1/2  litre whole milk
  • 1/2  litre evaporated milk
  • 10-15 green cardamoms
  • 1&1/2 - 2 cups granulated sugar depending on taste
Method:
  • Toast the crumpets on a pan  till they turn light brown ( ~3 mins) . Turn sides in between.
  • Arrange on a shallow glass serving dish.
Layered crumpets
  • Heat milk with cardamoms in medium flame. Keep stirring till reduced to almost half.
  • Add sugar and mix well. Bring to boil and turn off heat.
  • Pour on the crumpets. These buns will absorb a lot of milk depending on storage time so you might need to add milk later while serving.
  • Refrigerate and serve chilled. The taste is always better the next day.
Our version of 'Pithe'
You may garnish with nuts of your choice and saffron. I did not as I wanted to keep it simple.
Enjoy :)


Ajanta from Amherst