April 11, 2013

Paleo Lemon Pound Cake


     Before I start writing this blog, I would like to declare in public that I am NOT following  paleo diet ! I am too much of a foodie so far,  to do this :) But as saying goes 'never say never !' This was an experiment with a friend who is trying paleo and I was tempted to try something different after baking fatty sinful cakes for all these while.. Can't really deny the guilt trips most of us take after eating those yummy cakes...can we !?! Lemon is an all-time favorite and this one looked easily doable ! Turned out to be very tasty and exactly of the texture one would like pound cake to be ....here is the link for recipe we found but below is how we did it :) 
  
       We could not find all the ingredients we needed in the only grocery store we visited... Should not be hard to find if you at least try two stores may be ! We were lazy, but you are not  :P !!  So let's honestly call this a partial paleo cake :)

Prep Time : 20 minutes
Baking Time : 40-45 minutes
Serves : 5-10

      
Ingredients : 

Dry :

Almond flour - 2 cups                        
All-Purpose flour - 1/2 cup
Sea salt - 1/2 tsp
Baking soda - 1 heaping spoon

Wet :

Raw honey - 2/3 cup , warmed to a liquid state
Olive oil - 2/3 cup
Large eggs - 4
Full-fat coconut milk - 1/2 cup
Vanilla Extract - 2 tbsp
Lemon zest - 1 tbsp ( I mixed orange zest as well )

Glaze :

Freshly squeezed lemon juice : from 2 lemons ( Please strain it ) 
Lemon zest - from 1 lemon
Vanilla extract - 2 tsp
Raw honey - 4 tbsp


Preparation :
  1. Preheat oven to 350ºF.
  2. Prepare a 9x9 baking pan by coating the interior lightly with olive oil. 
  3. Sift dry ingredients in a large mixing bowl and stir with a whisk to combine.
  4. Place oil and honey and mix  for 1-2 minutes using electric blender. Add eggs, one at a time, mixing after each addition. Add coconut milk, vanilla, and lemon zest, and continue to process until well combined.
  5. Make a well in the center of the dry ingredients and pour in the wet ingredients. Use a wooden mixing spoon to thoroughly combine ingredients, pressing out any lumps. Use blender if needed and we did need :).
  6. Pour batter into prepared pan and bake for 40 minutes or until a toothpick inserted in the center comes out clean. The top was supposed to be lightly browned and mine came out dark brown.
  7. Let cake cool in the pan for 10 minutes, run a butter knife around the edge of the pan to loosen the cake, and then turn it out onto a cake plate and let cool completely.
  8. While cake bakes, prepare the glaze by adding vanilla extract, lemon juice, zest, and honey to the pan. Bring to a simmer over medium heat. Reduce heat to low and simmer for 10 minutes. Let cool to room temperature.
  9. Using the tines of a fork, perforate the top of the cake several times. Pour glaze over the cake, using a spatula to evenly distribute the glaze over the entire cake top. Let the cake rest for an hour to fully absorb the glaze. Serve immediately or cover and store in the refrigerator.

 It was a good combo with our evening Chai that day ! Totally non-paleo :P 

Have fun baking :)

Ajanta from Amherst

April 3, 2013

Easter bunny bread

This Easter, I wanted to tackle the dreaded bread monster. Armed with my lovely new (and red!) stand mixer, I decided to make some hot cross buns. The store-bought hot cross buns are a tad bit sweet for my liking.

So, on Good Friday, I baked the first batch of hot cross buns. I followed the Joy of Baking Hot Cross Buns recipe to the t, and they turned out to be wonderful. Thanks to my good friend Amrita of Sweet n Savory for being the inspiration. :)

Encouraged, I took on the basic white bread recipe from the book that came with my lovely new (and red!) stand mixer. Yes, I love my stand mixer that much!!! I wanted to make it look somewhat like this Easter Bunny Bread, but using fresh dough instead of the frozen. Here it goes -

Ingredients:

Basic White Bread:
1/2 cup low fat milk (I used 1%)
3 tbsp sugar
2 tsp salt
2 tbsp butter
2 packages active dry yeast
1 1/2 cup warm water
5-6 cups al purpose flour

Bunny shape:
2 raisins
2 sliced almonds
1 egg, lightly beaten

Method:

  1. In a small sauce pan, place heat milk, salt, sugar and butter in low heat until the butter melts. Let it cool to lukewarm. Meanwhile, dissolve the yeast in warm water. Let it 'activate' till foamy (about 10 minutes).
  2. In the mixer bowl, add the milk mixture and about 4-41/2 cups flour. Using the dough hook, mix it while adding the yeast mixture. Add the remaining flour and mix till the dough starts to come together in a ball. Knead till the dough is smooth. 
  3. Divide the dough into two equal parts and shape into loaves.
Now for the fun part - I almost relived my childhood days, playing with 'Play Doh' or ' Plasticine' as we called it then. 
  • Prepare a baking sheet - grease and line with parchment paper.
  • Cut a fourth off of one loaf and gently shape into a drop or pear shape to form the bunny's head. Flatten remaining portion into an oval shape and place on the sheet. Place head above body. I used a pair of kitchen shears to make cuts on each side of head for bunny's whiskers.
  • Divide the remaining loaf into four equal portions. I did that using a greased knife. For ears, shape two portions into 14-16 inches long ropes. Now, fold ropes in half and arrange them as the bunny's ears with open ends touching head. Gently tuck the open ends under the bunny's head, for a more clean look. I had to adjust the shape of the ears to fit my sheet tray.
  • Cut the third portion of dough into two and flatten them into ovals for paws. Cut two slits on the edge of each oval for bunny's tiny toes. Position on each side of the bunny's body. Now it should start to resemble a bunny.
  • Divide the fourth portion of dough into three balls.  Use two for front paws. Place paws on each side of body. You could make slits for its toes here as well. Cut the third ball into three, and shape them into two smaller (about 1 inch) balls for the cheeks and one 1/2-in. ball for nose. Place cheeks and nose on face. Add raisins for eyes and almonds for teeth.
Bunny bread as it sat on the counter to rise.
  • Cover and let rise in a warm place, about 30-45 minutes. I sprayed the cling film with oil so that it does not stick into the bunny as it rises. 
  • Once it is doubled, brush dough with egg. Bake at 350° for 20 minutes or until golden brown. Remove to a wire rack to cool.
Fresh out of the oven
  • Place bread on a serving tray. Cut a 3-1/2-in. circle in center of body. Hollow out bread, leaving a 1/2-in. shell (discard removed bread or save for another use). Place a 1-cup shallow bowl in the hole and fill with dip. I used some lettuce leaves to cover the bowl before placing the dip. Serve with vegetables, cheese and crackers of your choice.


It was a huge crowd pleaser, and no one wanted to take the first bite off the cute Easter Bunny!! It made for a wonderful Easter spread centerpiece :)

Bon Appetit!
Hetal from Houston

September 27, 2012

Orange pound cake with chocolate chips

Orange pound cake with chocolate chips
My Dad was a Boy Scout, and is very proud of his Boy Scout experiences. He never misses an opportunity to use the 'reef knot' or the 'clove hitch' in his day-to-day life. Once he made 'potato curry' in one of his camping trips, and apparently won the best cook title - we have heard this story a zillion times. Only recently did I find out that my Baa had measured all the spices and salt for him, and all he did was boil the potatoes and dump the spices!! So much for being the 'best cook' in the camp. 
His box of scout woggles, scarves and badges is definitely one of his prized possessions :) He spent one full afternoon explaining to his 6 and 8yr old daughters why the Scouts and Guides logo was the Fluer de Lis. I dont remember the story but was surely thrilled to learn a French word! :) It was a big deal for an 8yr old! :) 

Last week, I made an Orange Pound cake with chocolate chips for his birthday in my Fluer De Lis bundt pan. :) I was looking for the perfect recipe for my newest bundt pan, and my most reliable recipe source a.k.a Ajanta came to my rescue. It is a Barefoot Contessa recipe that turned out just perfect! I think the zest and the freshly squeezed orange juice add to the depth of flavour. Here it goes -

Serves: 10-12 persons
Preparation time: 15 minutes
Bake time: 45 minutes -1 hour


Ingredients:
For the cake
1/2 pound unsalted butter at room temperature
2 cups granulated sugar
4 organic extra-large eggs at room temperature
1/4 cup grated orange zest (I zested about 4 large oranges)
2 cups all-purpose flour plus 2 tablespoons
1 cup whole wheat flour
1/2 teaspoon baking powder
1/2 teaspoon baking soda
1 teaspoon salt
1/4 cup freshly squeezed orange juice (From the oranges already zested- I find it easier to zest an orange before the juice is squeezed out)
3/4 cup buttermilk at room temperature
1 teaspoon pure vanilla extract
2 cups good semisweet chocolate chunks ( I used chocolate chips, instead)
Orange syrup
1/4 cup sugar
1/4 cup freshly squeezed orange juice
Ganache
8 ounces good semisweet chocolate chips
1/2 cup heavy cream
1 teaspoon instant coffee granules

Method:
  1. Preheat the oven to 350°F (175°C). Grease and flour a 10-inch Bundt pan very well.
  2. In a large bowl, whip the butter and sugar with an electric mixer for about 5 minutes, or until light and fluffy. Add the eggs, one at a time. Then fold in the orange zest.
  3. In a separate bowl, sift together the dry ingredients - 3 cups flour, the baking powder, baking soda, and salt. In a measuring cup, combine the orange juice, buttermilk, and vanilla. Add the flour and buttermilk mixtures alternately to the creamed butter, beginning and ending with the flour. 
  4. In a small bowl, toss the chocolate chips with 2 tablespoons flour and fold them to the batter. Tossing the chocolate chips in flour prevents them from sinking to the bottom.
  5. Pour into the pan, smooth the top, and bake for 45 minutes to 1 hour, until a cake tester comes out clean. Let the cake cool in the pan on a wire rack for 10 minutes.
  6. Meanwhile, make the orange syrup. In a small saucepan over medium-low heat, cook the sugar with the orange juice until the sugar dissolves. Remove the cake from the pan, set it on a rack over a tray, and spoon the orange syrup over the cake. Allow the cake to cool completely. Tip: It is important to remove the cake from the pan at the specified time. Letting it cool in the pan may result in a tasty disaster :(
  7. For the ganache, melt the chocolate, heavy cream, and coffee in the top of a double boiler over simmering water until smooth and warm, stirring occasionally. Drizzle over the top of the cake. I didn't make the ganache, but it would surely make the cake more decadent! :)


Bon Apetit!
Hetal from Houston

September 14, 2012

Jhat-pat Lapsi

Jhat-pat Lapsi
Lapsi is probably my favorite traditionally Gujarati dish. It is almost like a 'halva' made of broken wheat. Typically made on auspicious days, such as New Year or during festivals, Lapsi is an integral part of the 'Nived' spread. My mom always makes Lapsi for our New Year lunch. We eat Lapsi with a simple potato curry. I know, I know, it sounds weird - but it is a delicious combination. My sister and I eat Lapsi by the bowl! Mom often had to whip up a big bowl for us when we returned from school. This is her 'jhat-pat' Lapsi recipe. Her it goes.

Serves: 2-3 persons
Preparation time: 5 minutes
Cook time: 8-10 minutes

Ingredients
1/2 cup whole wheat flour
1/2 cup suji/ semolina
3-4 tbsp melted ghee
3/4 cup water
1/2 cup gur/ jaggery
1/4 cup sugar

Method

  • In a medium bowl, mix the whole wheat flour, semolina and 3 tbsp ghee well, till it resembles a 'crumble'. Set it aside.
Whole wheat- Semolina 'crumble'
  • In a thick bottomed pan or a non-stick pan, bring 3/4 cup water to a boil. Add sugar and jaggery. Continue to simmer on low heat till the jaggery is completely dissolved.
Simmering jaggery-sugar syrup
  • Sprinkle the wheat flour-semolina crumble gently into the simmering jaggery-sugar syrup. Cover and let it simmer for about 8-10 minutes on low heat. Do not stir. It is done when a wooden spoon or spatula comes out clean. The consistency should be like a halva or upma.
Crumble sprinkled into jaggery syrup
  • Add 1 tbsp melted ghee and serve hot - as a main course Gujarati meal with curried potatoes or as a simple dessert.
Delicious Lapsi
Bon Apetit!
Hetal from Houston

September 11, 2012

Hearty tomato & root vegetable soup

Lake Agnes Tea House
We just came back from a wonderful vacation amidst blue lakes and snow capped Rockies. Almost everyone we spoke with was either an avid hiker, biker or a cross-country backpacker. After our hike up to Lake Agnes, we ate at the famous Lake Agnes Tea House. It is little log cabin in the hanging valley on the shore of the turquoise Lake Agnes. They serve over a hundred types of tea, soup, sandwiches, freshly baked bread etc. Their tomato vegetable soup with barley was fabulous. Served with home-made multigrain bread, I loved it so much that I was willing to hike up the next day just to eat that soup! :D

Today, I tried to recreate that soup with my own twist. I did not have barley at hand, so I left it out. Here it goes.

Serves: 2-3 persons
Preparation time: 20-25 minutes

Ingredients
2-3 small carrots
2 small beetroots
2 tomatoes
1 tsp butter
1/2 tsp cumin seeds
1-2 cloves
1-2 cinnamon pieces (about 1")
Salt
1/2 tsp freshly ground pepper
1 tsp brown sugar (optional)
Water

Method
  1. In a medium sauce-pan, bring 1 1/2- 2 cups of water to a boil. Add the peeled and diced carrots and beetroots and cover. Continue to cook on low heat till the beetroots are fork tender. Alternatively, you could roast the vegetables at 400F for 20-30 minutes for a smokier taste. Add the two tomatoes into the sauce pan and cook for another five minutes or so, till the skin peels off. Remove from heat. You may choose to peel the tomato skin off, once the tomatoes cool a bit.
  2. Once slightly cooled, blend the root vegetables and tomatoes in a blender. Add salt and pepper. 
  3. In the same saucepan, heat 1 tsp butter. Add cumin seeds, clove and cinnamon. Once the cumin seeds sizzle, pour the root vegetable and tomato mixture back in. Add 1-2 cups of water, and bring it to a boil. Add brown sugar if desired.
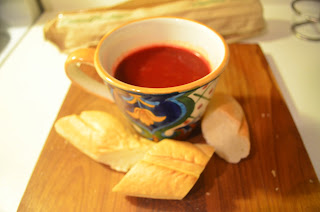
  4. Hearty tomato-root vegetable soup
  5. Serve hot with bread of your choice. I ate it with fresh French Baguette :) 
Bon Apetit!
Hetal from Houston

August 30, 2012

Cream Cheese Banana Nut Bread or Muffins

Banana Nut muffins
One of my friends has been experiencing an insatiable craving for bananas. She was telling me about it over the phone, and almost immediately I wanted to bake her some banana bread. My cousin sent me this old recipe from the Southern Living magazine long time ago - it was the perfect opportunity to put it to test. 

The recipe makes 2 loaves of banana bread or 24 muffins. I made 24 mini muffins and 12 muffins. Here it goes.


Preparation time: 15 minutes
Bake time: 25 minutes for muffins; 1 hour for loaves.
Cool time: 30 minutes

Ingredients
3/4 cup unsalted butter, softened
1 pack (8oz.) cream cheese, low fat, room temperature
1 1/2 cup all purpose flour
1 1/2 cup whole wheat flour (The original recipe called for 3 cups all purpose flour)
2 cups granulated sugar
2 large eggs, room temperature
1/2 tsp baking powder
1/2 tsp baking soda
1/2 tsp salt
1 tsp pure vanilla extract
4 medium very ripe bananas, mashed
1 cup walnuts, cashews etc. (The original recipe called for pecans)


Method
  • Preheat oven to 350 F. Prepare the loaf pans or muffin tins. I used paper liners for both the muffins and mini muffins.
  • In a large bowl, blend softened butter and cream cheese until well mixed. Add sugar and beat with an electric beater till light and fluffy. 
  • Add the eggs one at a time and whip till incorporated. 
  • Add the flour and blend till completely incorporated. It will be a thick batter. 
  • Now add the baking soda, baking powder, salt and vanilla extract.
  • Fold in mashed banana and 2/3 cup nuts. Pour into muffin tins or loaf pans. 
  • Sprinkle remaining nuts on the batter.
  • Bake muffins for 25 minutes or until done. The loaf takes about 1 hour. Cool completely on wire racks. 


Bon Apetit!
Hetal from Houston

August 28, 2012

Doi Begun -Bengali Style Eggplant in Yoghurt Gravy

Eggplant has been one of my favorite veggies though my husband who does not like it much  keeps saying it is 'begun', meaning of no quality in Bengali! So I never miss an opportunity to make baingan when he is not around and I am with friends who relish it as much I do. In one such recent gathering we made this typical Bengali dish which I learnt from my mother in law.

Serves: 4-5 persons
Preparation Time: 5 mins
Cooking Time: 20 mins

Ingredients:
1 medium sized eggplant/ baingan, cut horizontally in round medium sized pieces.
1 cup vegetable oil (Bengalis SHOULD use mustard oil for the authentic taste we like ;))
1 cup yoghurt
4-5 green chillies
1 1/2 teaspoon mustard seeds
1/2 tsp sugar
Salt to taste
Cilantro, to garnish
Method:
  • Heat oil in pan and deep fry eggplant /baingan. I just learnt that a friend's mom who makes this dish often actually shallow fries the baingan, making it the healthier option.
  • Arrange baigan in a glass container and soak/drain oil in paper towel (the healthier option).
  • Blend yoghurt, chillies, mustard seeds, sugar and salt. Add water to blender to make the gravy thinner.
  • Pour gravy on baigan.
  • Garnish with cilantro. This dish tastes the best when complimented with hot rice.
Enjoy :)
Doi begun with bhaat ...aaah!!!!! 
Ajanta from Amherst

August 14, 2012

Daal Dhokri - Gujarati one pot meal

Daal Dhokri
While pasta, quinoa and couscous dishes have become a part of our weeknight dinner plans, some quintessentially Gujarati dishes have found their way into my 'weeknight go to recipe' list. Daal Dhokri is one such dish. Simply put, it is spiced whole wheat pasta cooked in lentil soup that is a sumptuous combination of proteins (toor daal 'sauce'), carbohydrates (roti 'pasta') and fresh vegetables. To my mind, it is a nutritious one pot Gujarati meal that makes for very few dishes to clean after a weeknight dinner! :) Here it goes -

Serves: 3-4 persons
Preparation time: 15 minutes
Cook time: 40-45 minutes

Ingredients
For Daal
1 cup toor daal
1 tbsp oil
1 tbsp ghee
1/2 tsp mustard seeds
1 bay leaf
2-4 cloves
2 cinnamon pieces, 1" long
1" ginger, minced or grated
2-3 green chillies
1 sprig curry leaves
1/2 tomato
5-6 tbsp jaggery
2 tbsp lemon juice
2-3 tbsp peanuts, raw (optional)
1/2 tsp turmeric powder
1/2 tsp red chilli powder
Salt, to taste

For Dhokri
1 cup whole wheat flour
1/2 tsp turmeric powder
1/2 tsp red chilli powder
1/4 tsp asafoetida powder
1 tbsp canola oil
salt to taste


For garnish
1 small onion, finely chopped
1-2 small potatoes, boiled, peeled and chopped (optional)
1 cucumber, diced (optional)
1-2 tomatoes, diced
1/4 cup coriander leaves

Method
For Daal:

Simmering toor daal
  1. Rinse the toor daal till water runs clear. Cook the daal in a pressure cooker with 2 cups water, salt, turmeric and ginger. It took about 3 whistles in my cooker, but time taken may vary. Once cooled, blend the daal in a blender.
  2. In a large sauce pan, heat the ghee & oil. Once hot, add mustard seeds and let it sputter. Add curry leaves, cloves, cinnamon, bay leaf, green chillies and asafoetida. Add blended daal and mix well. Add about 3 cups of water, jaggery, chilli powder, peanuts, tomato and salt.
  3. Bring the daal to a boil and simmer for 15-20 minutes while stirring occasionally. Add lemon juice just before adding the dhokri.
For Dhokri:
Diamond shaped dhokri pieces, ready for the daal pot
  1. In a large bowl, knead wheat flour into a firm dough using warm water and 1tbsp oil. Add turmeric powder, red chilli powder into the dough. Set the dough aside for 10-15 minutes.
  2. Divide the dough into 5-6 golf ball sized portions. Roll each dough ball into large thin chapatis. I rolled the rotis to about 8-10" in diameter, since I have a large rolling board.  
  3. Once rolled, cut roti into diamond or square shapes using a knife or a pizza cutter. 
  4. Meanwhile, bring the daal to a boil, and add the roti pieces one by one (to prevent any lumps). Continue to roll the remaining dough balls, cut into small pieces and add to the boiling daal.
  5. Cook the dhokri in daal for 10 minutes or till the dhokri is completely cooked.
To serve:
  1. Serve hot daal dhokri in a deep bowl. Garnish with the chopped onions, potatoes, tomatoes, onion and coriander leaves.
  2. You could add a drop or two of ghee for added taste. Its purely optional, though.
Sumptuous Daal Dhokri
Bon Apetit!
Hetal from Houston

July 30, 2012

Puchka - Kolkata style

Kolkata is known for its sweets and its hard-to-miss sandesh shops at almost every corner. The rest are practically taken over by street food vendors a.k.a the neighborhood Puchka wallas and 4th generation Jhal-muri wallas. Of all the street food Kolkata is famous for - Jhal-muri, Radha-Vallabhi, Kulfi, Pyaji, Beguni and even Kati Rolls, Puchka wins hands down. A trio of textures unite to result in a mouth watering delight called the Puchka. It comprises of a crunchy semolina puri with soft potato filling dipped in tangy sweet mint water.

Almost every part of India has its variation of this street food, made with its slight twist and known by a different name. Its called 'Gol-gappey' in Delhi, 'Pani puri' or 'Gup-chup' in Gujarat-Maharashtra and ofcourse, 'Puchka' in Kolkata. I've had long, almost heated debates in my hostel room with friends from Delhi and Mumbai who claimed that the Delhi Gol-gappey or the Mumbai Pani puri tasted better than Kolkata Puchkas. Having tried all the variations - I think the Kolkata Puchkas are the best! My mom even made the puchka puris at home. She always made a Jain version for Baa using raw bananas instead of potatoes for the filling - Strangely, the Jain version was always more appealing to me. I tried to make a slightly healthier version of her recipe by replacing part of the potato filling with green bananas/ plantains. Here it goes -
Potatoes and plantain for the filling


Serves: 4 persons
Preparation time: 30 minutes


Ingredients
30-40 puchka puris (mine were store bought)
Filling
2 large potatoes, boiled
1 plantain, boiled
1/2 cup black chick peas/ lal chana, boiled
Salt
1/4 tsp rock salt
1 tsp roasted cumin powder
1 tsp red chilli powder
Mint leaves
1/4 cup coriander leaves, chopped
Spicy water
4-5 cups water
1-2 tsp tamarind pulp
1 cup mint leaves, chopped
1/2 cup coriander leaves, chopped
2 green chillies
2 tsp cumin powder
1-2 tsp red chilli powder
1/2 tsp rock salt
2 tbsp date-tamarind chutney (optional)

Method
1. Filling
  • Mash the potatoes and plantains together in a medium sized bowl. Ensure that there are no lumps of potato or plantain. Sometimes, I grate the potatoes for a more even texture. 
  • Add the remaining spices and salt to taste and mix well. 
  • Add the black chick peas and coriander leaves and mix again. Set aside.
2. Spicy water
Soaking tamarind pulp in water
  • Soak tamarind in a large bowl with 4-5 cups of water for 15-20 minutes. 
  • In a blender, add mint, coriander and green chillies with salt and blend into a paste. 
  • Add some of the tamarind water, cumin powder, red chilli powder, rock salt and blend. Taste before you add salt, because the rock salt and tamarind add saltiness to the mixture. 
  • Now, add this mint-coriander paste to the remaining tamarind water and mix well. Refrigerate till ready to serve. If you want a sweet-tangy taste, add the date-tamarind chutney. I usually leave it out, and add it while eating.
Spicy mint water
3.  Serving (or eating!)
  • Make a 1/2 inch hole on one of the sides of the puchka puri. Fill a teaspoon of the potato filling.
  • Add a drop or two of the date-tamarind chutney. 
  • Dip the potato filled puri in a bowl of spiced water and serve or eat immediately!! 
Puchka- Kolkata style
Bon Apetit!
Hetal from Houston

July 4, 2012

Beetroot Halva


As a child I relished the sweet taste of steamed beets and loved the magenta hue much more! It was my 'lipstick' - would often pester Mom or Baa to cut a slice of beetroot such that I could hold it between my little fingers like a real 'lipstick' and paint my face all over. :)
I know now that beetroots are a wonderful source of potassium, magnesium, folic acid and iron as well as vitamins A, B6 and C.
I made a super simple beetroot halva for some friends after a Biryani dinner. Enjoy it with little less guilt, coz also good for you! ;) Here it goes.


Serves: 6-8 persons
Preparation time: 10 mins
Cook time: 30 mins


Ingredients
3 large beetroots, grated (about 3 cups)
14 oz. sweetened low fat condensed milk
1 tsp cardamom seeds, crushed
1 tbsp clarified butter/ ghee
1/2 cup chopped nuts (cashews, almonds, pistachios etc)
1/2 cup raisins


Method
  • Heat a large thick bottomed skillet, add ghee. Once warm, add cardamom seeds to infuse the aromatic flavor of the cardamom throughout the halva.
  • Add grated beetroots and saute till softened.
Grated beetroots sautéed in ghee
  • Add condensed milk and stir occasionally till the beets cook completely and turn slightly glossy - about 25-30 minutes. Most of the moisture would have evaporated by then. Note - The halva will thicken further as it cools.
  • Fold in the raisins and nuts. 
  • Garnish with nuts and serve. It can be served hot or chilled. 
Beetroot Halva
Notes: Condensed milk can be substituted by milk and sugar to taste. To make it richer, cashew paste or  khoya could also be added. 


Bon Apetit!
Hetal from Houston