April 8, 2014

Samosa

Samosa
Our first guest post from a fellow foodie and friend from a lifetime ago, Senjuti. She is a wonderful cook (surprise! surprise!) and a fantastic photographer. This is her take on the delicious potato and pea filled deep fried pastry called Samosa. 

Preparation Time: 30 mins
Cooking Time: 15 mins
Serves: 6-8 (depends on how well your guests eat)

Ingredients:
Garam Masala
2 large or 3 medium sized potatoes (roughly 450 - 500 gm or 1 lb)
2 cups all purpose flour (Maida)
1 cup whole wheat flour (Atta)
1 – 2 cups of water to knead the dough  
1 cup of peas (Frozen works great. This is however an optional ingredient)
1 teaspoon carom seeds (ajwain)
1 teaspoon asafoetida (I use it a little heavy handedly because I love the smell – feel free to add only half teaspoon)
1 teaspoon ginger powder or ½ teaspoon minced fresh ginger
Garam-masala of your choice – you can purchase it at any store that sells Indian groceries (I use a special blend that I get from my grandmother’s house in semi-rural central India which I think adds to the earthy flavors of the samosa)
Salt to taste
Ajwain seeds
Vegetable or Canola Oil – 3 to 4 tablespoons full (use more if you want a yummier and unhealthier version)
More oil for deep frying (this is not the healthiest snack that was invented :P )


Method:
  • Boil the potatoes, peel them and mash them half way through in a big bowl and set aside.
  • In a pan heat 2-3 tablespoons of the oil and temper the carom (ajwain) seeds over medium high heat and immediately add the asafoetida and ginger one after the other and lightly temper them together.  Add the peas once the heat rises slightly (keep a careful watch so that you don’t end up with burnt seasoning).
  • Add the lightly mashed boiled potatoes and then add the garam masala and cook for a while till the rawness of the spices are cooked out.
  • Add salt, mix well and take off the heat. Set this aside.
  • Potato filling
  • Take both kinds of flours in a big bowl and add a few pinches of salt and 1 tablespoon of oil and knead it into a ‘tight’ dough.  Don’t ask me what it means, that’s how my Ma always described the dough for ‘loochi’ or ‘nimki’ and that’s how I figured it means the dough shouldn’t be gooey and should yield nicely to the touch, do the best you can.  It is just like when you used to play with play-dough in kindergarten – the dough should be pliable and should kind of bounce back to a poke/nudge.
  • On a rolling board, pinch out small balls of the dough (roughly the breadth of your index and pointer laid side by side when the dough is an inch thick) and make rough circular shapes with a rolling pin (making circular shapes roughly the size of your palm).  Place a tablespoon of the potato mixture which you had kept side in the center and then fold the circular shape in half – kind of like a semi circle.
  • Once you fold over, press the bottom with the top of a finger and then take one side and fold it over to the middle. It helps if you have eaten a samosa – kind of make it into a conical pocket – the pictures show how I did them.  Please let me know if you find a more efficient way to fold them.   
Samosas in the making

  • Once you have successfully made all the potato - pouches, deep-fry them in medium high heat, taking care to not burn.  Once the whole exterior is golden brown, it is done.  There is very less chance of under cooking these because the insides have already been cooked once.   
  • Lay out on a plate and have super fun devouring them with any ketchup or tamarind or coriander chutney that you can lay your hands on.  I skipped the tamarind chutney recipe because I made mine in two steps in the last minute.
  • Lastly, have fun making them :)

Crispy samosas ready to eat!
It’s the easiest fancy sounding snack I have ever served my guests. The folding sounds tedious in writing, only if you saw me do it, I promise you it is so much easier than it sounds. My guests always appreciate the thought and taste – I know my samosas look imperfect and that’s what I like about them – they look homemade and taste sinful – the perfect combination on a rainy/snowy day!  

    Bon Appetit!

    Senjuti from Ithaca

    March 25, 2014

    Tri-colored Potato subzi

    Most people I know love the tuber more than any other vegetable, including my own sister. Not me- I detest potatoes! While I was in school, I stopped eating potatoes all together for months, and I was very happy in my potato free world until Mom coerced me to eat them because she was running out of lunch pack ideas without potatoes :) While I do still eat them, I rarely make any potato dishes at home.

    The ONLY potato preparation I liked was a potato bhaji that my maternal grandma made with thinly sliced potatoes, with the skin intact. I called it 'chhilka walu shaak' ie potato subzi with skin intact. Here's my twist on that recipe using much more interesting tri-colored fingerling potatoes - Purple, Red and Yellow.

    Prep time: 10 minutes
    Cook time: 20-25 minutes
    Serves: 4

    Ingredients:
    8-9 medium sized potatoes (I used 3 purple, 3 red and 3 yellow); washed thoroughly
    2 tbsp Canola or any white oil
    1 dried red chilli
    1 tsp mustard seeds
    1 bay leaf
    1/2 inch fresh ginger, minced
    1/2 tsp Turmeric powder
    Salt (to taste)
    11/2 tbsp Coriander powder
    1/2 tbsp   Cumin powder
    1 tbsp red Chilli powder

    Method:
    • Slice the potatoes very thin, about 1/8th of an inch. You might want to soak the sliced potatoes in a bowl of water to prevent browning, its purely optional, though.
    • In a medium fry pan, heat oil. Add mustard seeds and let them pop. Once the popping subsides, add dried red chilli, bay leaf and ginger and fry for a minute or so.
    • Add the sliced potatoes. If soaked in water, squeeze gently to remove excess water before adding to oil.
    • Toss gently till the tempering coats most potato slices, and then add turmeric and salt. Cover and cook for about 5-7 minutes. Once the potatoes are slightly translucent, add the remaining spices - coriander, cumin and chilli powder. Toss gently to avoid breaking the thin slices.
    • Cook uncovered in medium-low heat till the potatoes are done, and some are crispy golden brown.
    • Serve hot with paratha or roti.
    Bon Appetit!
    Hetal from Houston


    March 4, 2014

    Berry Berry Berry Lemony cake


    This winter has been the longest, by far. We're seeing hard freeze days here in the south in March. That's way too cold for tropical creatures like me. I love the summer months, primarily because of the wide variety of fruits that hit the market - including all the yummy berries, lemons and of course, mangoes! :)

    One of the few days when Houston weather was nicer, I saw some wonderful berries in the local market. I knew I had to buy them the moment I set my eyes on them. It was probably my attempt to feel that warm summer days are here again! One of my friends has the sweetest tooth I know. She loves cakes with fruit in them, so I decided to bake one with lots of berries for her birthday. It turned out to be 'Berry Berry Berry Lemony'! Based on a recipe by smittenkitchen, here it goes: 


    Ingredients:
    Cake

    2 1/2 cups plus 2 tablespoons all-purpose flour
    2 teaspoons baking powder
    1 teaspoon fine sea salt or table salt
    1 cup unsalted butter, at room temperature, cubed.
    1 3/4 cups granulated sugar
    Zest of 1 lemon (I used a zester, but a small cheese grater works well, too)
    3 large eggs, at room temperature
    1/2 teaspoon vanilla extract
    3/4 cup buttermilk
    3 cups mixed berries, rinsed and dried (I used blackberries, raspberries and blueberries)

    Glaze
    2 cups powdered or confections’ sugar Juice of 1 lemon 1 tablespoon unsalted butter, very soft.


    Method:
    ·    Preheat oven to 350°F. Generously grease a 10-cup Bundt pan with softened butter and set aside. I used my favorite Fleur-de-Lis bundt, for added pizzazz.
    ·    In a medium bowl, whisk or sift 2 1/2 cups flour, baking powder and salt together and set aside. I used my newly acquired flour sifter.
    ·    In the bowl of a stand mixer, beat the butter, sugar and lemon zest until fluffy, about 3 to 5 minutes. It is crucial that the butter is at room temperature, so the butter and sugar fluff up nicely.
    ·    Now, with the mixer on a low speed, add eggs one at a time. Beat in vanilla extract.
    ·    Add 1/3 flour mixture to batter, beating until just combined, followed by half the buttermilk, another 1/3 of the flour mixture, the remaining buttermilk and remaining flour mixture. It is important to start and end with the flour mixture. Don’t forget to scrape the sides of the bowl from time to time.
    ·    In a small bowl, toss the berries with 2 tablespoons of flour and gently fold the berries into the cake batter. The batter will be very thick.
    The batter is very thick
    ·    Spread cake batter in the prepared baking pan and spread the top smooth. Bake for 55 to 60 minutes. The cake is done as soon as a tester comes out clean of batter.
    ·    Set cake pan on a wire rack to cool for 30 minutes, before inverting the cake onto a serving platter. I find that taking the cake out before it cools completely helps unmold a Bundt cake easily. Cool completely.
    ·    Once cooled completely, prepare the glaze by whisking together the powdered sugar, lemon juice and butter until smooth and thick, almost like crepe batter. Spread carefully over top of cake, letting it trickle down the sides.
    ·    Serve at once or keep it covered at room temperature for 3 to 4 days. I garnished the cake with some more berries with the help of my friend’s 3 year old! 

    Glazed Berry Berry Berry Lemony cake
    Berry Berry Berry Lemony cake

    Bon Appétit!

    Hetal from Houston


    February 5, 2014

    Italian Turkey Loaf Burger


        We were following a partially paleo diet for sometime in our quest for healthy eating habits. As long as I got to make and taste  new and exciting food, my enthusiasm quotient is unlimited. It is especially high when I am the sous-chef for the evening and hubby is taking lead in the kitchen ;)!
    On one such rare evening which also was our first Paleo dinner, we tried making this loafless burger; very simple homemade tasty healthy stuff! When foodlovers cook it can hardly go wrong; try it for yourself with your choice of veggies or meat  :)

    Serves: Makes 6 burgers
    Prep time: 8 mins
    Cooking time: 25-30 mins

    Turkey Loaf Ingredients:
    • 1 lbs turkey mince (can be replaced with minced chicken )
    • 4 sundried tomatoes (chopped)
    • Small handful of olives (chopped)
    • 2 garlic cloves finely chopped
    • 3 teaspoons tomato puree
    • 2 teaspoons of dried mixed herbs (we used fresh cilantro instead)
    • ½ teaspoon of sea salt
    Filling:
    • Avocado sliced
    • Lettuce
    • Cherry tomatoes sliced in half

     Instructions:

    • Pre-heat the oven to 350 °F (180 °C).
    • To prepare your burgers place all the ingredients together in a large bowl and mix well with clean hands. Once thoroughly combined shape into six burger patties and place in an oven proof dish or grill pan in the oven.


    • Cook for 20-25 minutes or until cooked through.
    • Allow to cool slightly and then slice and fill with layers of avocado, tomatoes and lettuce and a drizzle of olive oil.


     Enjoy your burger :)


    -Ajanta from Amherst 


    January 16, 2014

    Patishapta for Makar Sankranti

    Winter time is especially busy for the sweet shops in Kolkata, with a plethora of 'nolen gur' or 'first harvest jaggery' sandesh and rossogollas. While in law school, couple of my friends and I would often walk to the nearest sweet shop after dinner and devour freshly prepared 'notun gur-er rossogollas' for dessert. We frequented the shop so much, that the server stopped asking for our order, and would simply bring out plates full of warm rossogollas. Ah! Those 'mishti dates' are long gone...

    During the harvest festival of Makar Sankranti, the sweet shops would sell 'patishapta' - sweet crepes filled with coconut-jaggery inside. This year, having just returned from India, we simply could not sit and crave for the sweets that are synonymous with Makar Sankranti. So, one of my friends and I decided to make some patishapta, even though it was bang in the middle of the week. Here it goes:

    Ingredients:

    Crepe batter:
    1/2 cup all purpose flour
    1/2 cup semolina/ suji
    1/2 cup milk plus more to get desired consistency
    1/4 cup jaggery or sugar

    Filling:
    1 cup fresh grated coconut
    1/2 cup grated jaggery
    1/2 cup khoya ie dried whole milk(optional)
    2 tablespoons granulated sugar
    1/2 tsp cardamom seeds powered
    1 tbsp ghee

    Khoya gravy for dipping/ garnishing (optional)
    1/4 cup khoya grated
    4 tsp sugar
    pinch of cardomom seeds, powdered
    dash of milk

    Method:

    Filling:
    • Heat ghee in a medium fry pan. Add cardamom powder and grated coconut in quick succession.
    • Saute for a few minutes till the coconut is light brown in color. 
    • Add jaggery and sugar and mix well. 
    • Continue to cook till the mixture is evenly cooked and the jaggery/ sugar is completely incorporated. Set aside to cool. 
    Alternatively, you could go the shortcut method, and crush some home-made coconut - jaggery laddoos brought from India, add some khoya, and warm it with some milk and call it a filling. That's what we did. :)

    Crepe batter:
    • Whisk the all purpose flour and semolina in a medium bowl. 
    • Add milk gradually and mix together for a very thin batter. 
    • In a small bowl, mix jaggery/ sugar and two tablespoons of milk and microwave for 15 seconds, till the jaggery/ sugar melts completely. Add to the batter and mix well. 
    Khoya gravy
    • In a small pan, heat the khoya, sugar and milk together until well incorporated. 
    • Add cardomom seed powder and set aside. The gravy thickens as it cools, so you might have to add more milk or warm it up while garnishing.
    Making the patishapta:
    • Once all the preparation is done, heat a non-stick tawa or flat bottomed skillet to medium heat. 
    • Brush on a little bit of ghee or oil, and pour a small ladle full of batter. Rotate the pan to spread the batter in a thin layer. Cook till slightly golden brown in color.
    • Gently place a tablespoon of the filling on one edge of the crepe. Roll it like a frankie and gently pat it to spread the filling evenly inside the crepe. Repeat process with remaining batter.
    • To serve, place the patishapta in a plate, and gently drizzle the Khoya gravy on top. 
    Bon Appetit!
    Hetal from Houston

    January 2, 2014

    Creamy Avocado Smoothie

       Let us start healthy and simple this New Years :)
    I got introduced to avocadoes only after I moved here and now know its Indian name is Makhanphal a.k.a butter-fruit. Hetal and I both love this fruit and eat avocados in any form...literally ! It is very  nutritious so indulging in avocados is totally allowed.


        An over ripened avocado in my fridge a few weeks back made me  try making smoothie  out of it. Such is the fate of any ripened fruit in our kitchen; either it goes into a cake batter or used for making smoothie ...nothing healthy is at least tried to be not wasted ! It was a very simple recipe which was equally filling and  healthy. I am very biased towards avocado...so make it and taste it for yourself  :)


    Serves : 1-2 persons

    Ingredients :
    • 1 avocado - ripe, halved and pitted 
    • 1 cup milk
    • 1/2 cup vanilla yoghurt ( I added plain yoghurt and a drop of vanilla extract )
    • 3 tbsp honey
    • Ice cubes if you want it chilled
    Method :

    Blend everything and your smoothie is ready to be served ! I used basil leaves from my garden for the fancy look but you can get more creative with anything from your garden or fridge.


    HAPPY NEW YEAR Everyone !! Have a yummy and healthy year ahead :)

    Ajanta from Walnut Creek


    December 26, 2013

    Traditional Fruit and Nut Cake

       The credit for this cake recipe goes to The Duffadars !! This was the first cake I ever baked and is the most frequently made one in our oven . I have been following this blindly since Hetal passed me her family recipe over an email a few years back. The  baking bug has been biting me since last few days and this evening the irresistible urge made me try the recipe yet another time ;  I was not failed this time either :) The room still smells of freshly baked cake and adding onto the holiday vibes.

    Fruit and nut Cake

    Prep Time : 20mins
    Baking Time : 35 mins
    Serves : 4-8

    Ingredients:
    • 1 cup flour
    • 1 cup sugar
    • 2 eggs
    • 125 g butter ( 1 and 1/4 sticks)
    • 1 tsp vanilla essence
    • 3/4 tsp baking powder
    • 1/4 tsp salt
    • 1/4 tsp nutmeg
    • 1/2 tsp cardamom powder
    • 1 cup nuts etc ( cherries, raisins and cashews; I added crumbled pethas I got from my recent India visit)

    Method :
    • Preheat oven to 350 F.
    • Mix butter, sugar and eggs using a hand blender.
    • Add in other dry ingredients slowly to ensure uniform mixing.
    • Bake for 35 mins.
    Serve warm with icecream !! Heavenly :)

    Keep Baking !

    Happy Festive Season ,

    Ajanta from Walnut Creek


    November 20, 2013

    Fishy Chocolate Cake

    One of our friends' child, Z is learning to talk and his vocabulary is increasing manifold. One evening, they came over for dinner, and we were having a relatively quiet evening when suddenly little Z pointed at a tea -coaster and said 'Feeesh'! We all burst into a laughter. That was probably the first word he spoke all evening.

    It was Z's 3rd birthday and we decided to get him a set of magnetic fishing poles to 'reel in' all the 26 letters of the English alphabet that were engraved on foam shaped like fish. Keeping with the 'fishy' theme, I baked a simple chocolate cake and shaped it into a fish. Little Z's reaction was priceless, and worth every minute of work that went into it. Here it goes -

    Time: 2.5 hours (baking, cooling and frosting)
    Serves: 6-8 persons

    Cake:
    I simply followed my tried and tested recipe for a basic chocolate cake here, except that I used regular cocoa powder instead of dark cocoa powder. Since I wanted to shape it into a fish, I baked it in a single layer square 9x9 inches cake pan.

    Frosting:
    1-1/2 sticks of unsalted butter at room temperature
    1-1/3 cups of powdered sugar
    Food coloring of choice (optional)
    M&Ms (sorted according to color)
    • Whip the butter with sugar into a light fluffy frosting, about 5-8 minutes. 
    • Add food coloring of choice. I did not want a white frosting for a child's cake, so I added a few drops of blue and yellow food coloring gel to get a light pastel green color. Set aside.
    Shaping the cake:
    • Once the cake is completely cooled, gently score out the body of a fish. Cut long the score marks using a serrated knife.
    • Place two of the cut out corners along the lower half of the body, to form the fins. Take one of the remaining corners to make the tail. Gently pick up each part and place it on a tray. Trim edges to get desired shape. Attach with toothpicks so the fins and tail stay in place.

    • Before frosting, tuck in strips of parchment paper under the cake sides that can be removed after frosting for a clean finished look.


    • Using a offset spatula, spread the frosting evenly on the cake, starting from the centre and working your way out. Frost the sides and edges completely. 


    • Time to let your imagination run wild. Decorate with M&Ms or any other topping of your choice. I chose M&Ms because Little Z likes to call them gems :)


    • Remove parchment strips for a complete and clean look.


    It was a colorful and bright fish, for a happy little 3 year old :)

    Bon Appetit! 
    Hetal from Houston

    November 14, 2013

    Diwali Special - Ghughra

    It is the festival season that makes us all nostalgic. There are so many wonderful memories of Diwali that I don't know where to start. As we were growing up, we watched Baa and Mom whip up wonderful snacks and sweets for Diwali. The Saat-padi nimki (7 layered salty snack), fafda, mathia and my favorite Ghughra were quintessential and almost synonymous with Diwali in our house. Diwali was the only time Mom would undertake the massive task of preparing them. Ghughra making time for almost like an assembly line - My sister dividing the dough into small balls, I rolled them into flat discs, Baa would fill and close them and Mom would fry them into crispy golden deliciousness.

    Ghughra
    All through the process, I would be eagerly waiting for that first bite of the Ghughra I'd been waiting to eat since last Diwali! Often, I begged Mom to make it at other times of the year, but she never agreed. I now know that it is an undertaking that she was willing to go though only once in a year! :)

    This year, Diwali came a bit early in my house with my parents visiting us here. As a pleasant surprise, Mom agreed to make all the Diwali goodies for me before they returned back to India. Needless to say, we heralded the festive season with delicious Ghughra. Here it goes:

    Prep time - 2 hours
    Yield - 35-40 pieces

    Ingredients:

    Filling:
    400 grams Khoya/ Mava (room temperature)
    1/3 cup chopped cashews
    1/4 cup almonds
    1/4 cup pistachios
    1/3 cup raisins
    2/3 cup sugar or more to taste
    1 tsp cardamom powder
    1/2 tsp nutmeg powder

    Dough:
    11/2 cups All purpose flour
    Pinch of salt
    1 tbsp ghee
    Water

    Ghee for frying

    Method:

    Filling:
    Khoya filling
    • In a medium pan, roast the mava/ khoya until slightly golden brown and aromatic. Stir continuously.
    • Crush all the dried fruits into a course powder in a grinder. Gently mix the dried fruits with the roasted mava, stirring continuously. 
    • Add raisins, cardamom powder, nutmeg powder and sugar.
    • Stir for 5 minutes till sugar is evenly mixed and remove from heat.
    • Let it cool completely.

    Dough:

    • Mix all purpose flour, salt and ghee together. 
    • Add small amounts of water as required and knead it into a soft dough. 
    • Divide the dough into small penny sized balls and cover with a damp cloth.
    Ghugra making: 
    • Once the filling is completely cooled, start rolling the dough balls into small discs, much like puris. 
    • Take a tablespoon of the filling and heap it on one side of the disc. Gently fold the other half of the disc on top of the filling, to make a half moon shape.
    • Now pinch the dough on the end of the semicircle and twist it to seal the edges. This can be done using a fork, too. Just gently press a fork tongs on the dough edges to seal and ensure that the filling does not pop out while frying.
    Dough edges pinched and twisted to seal the filling inside
    • Repeat until all ghugras are ready to fry.
    • Fry in ghee till golden and crispy.
    Golden delicious Ghughra

    I'm glad Diwali came early to my house :)

    Bon Appetit!

    Hetal from Houston

    November 7, 2013

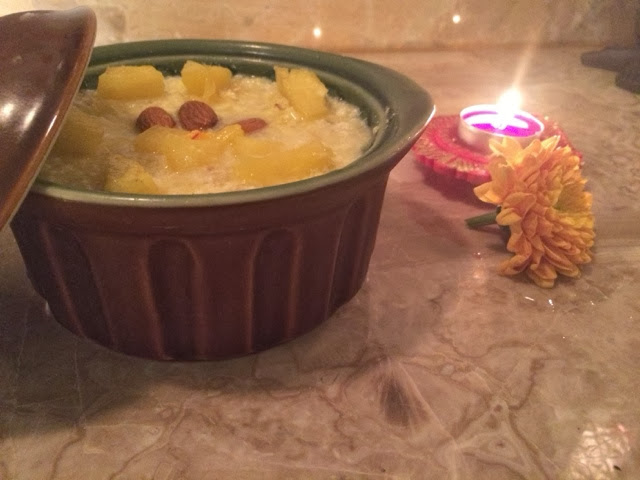
    Pineapple Kheer

    This Diwali celebration was a little bit different. It was just the two of us in our new nest in Walnut Creek, CA - far away from the friends we usually celebrate with. Its a new place that promises a new life but memories of good times spent with friends lingered ... I was missing fun we all had cooking together. 

    What better way to feel better than to whip up some new recipe for Diwali. I decided to make something simple yet new for the Lakshmi pooja. Rice kheer is simple…and pineapple is our favorite fruit!! There you go… Boom! It took me less than a minute to decide to put them together. 

    So I looked up recipes online (a.k.a due diligence) and finally thought the best way would be to stick to the way our Didu (grandma) made kheer and then add pineapple to it. After all, Grandma knows best! Here it goes-

    Prep Time: 5 mins
    Cook time : 30-40 minutes
    Serves : Should be good for party of 4-6.  It was a lot  for just the two of us, so I froze most of it in small plastic containers for much needed portion control!


    Ingredients
    :
    Ingredients for pineapple kheer
    Milk - 11/2-2 cups (Any type)
    Rice- ¼ cup
    Sugar
    Fresh Pineapple – ½ cup diced into tiny pieces
    2-3 Cardamom pods
    Raisins (optional)
    Saffron -  few strands
    Almonds (Sliced)

    Method:
    • Soak rice in water for about 30 minutes. Strain and set aside.
    • Heat milk and let it boil. Add pre-soaked rice to boiling milk.
    • Add sugar and stir till dissolved completely.
    • Add cardamom, saffron and almonds.
    • Add pineapple last and simmer for no more than 2-3 minutes to prevent milk from curdling.
    • Garnish as you desire. I garnished with saffron, almonds and freshly cut pineapples.
    • Serve warm or chilled.

    Pineapple Kheer

    We thought it was different and tasty …pineapple flavor gave the rice kheer a new twist!!!
    Hope you will like it.

    Happy Diwali!

    Ajanta from Kunming, China this time! :P